Attaching MOLLE / PALS / ALICE gear to the ARKTYPE Dashpack
At ARKTYPE, we believe in subtlety. All of our products were designed to not only be functional, but sleek and understated to blend in with your other gear. When we set off to build our Dashpack. Our team decided against adding the standard MOLLE / PALS webbing to our products to maintain a sleeker, more office professional look.
We have all seen packs with rows upon rows of tactical webbing sewn across it, and while functional in the most hostile environments, they do look out of place in an everyday commute or general work setting. We wanted to create something that had a more refined look but maintain a similar functionality.
In the end, we designed the ARKTYPE Dashpack to fit most MOLLE/PALS gear, and also be compatible with the older generation ALICE gear as well.
MOLLE (Modular Lightweight Load-carrying Equipment) is the modern generation of modular load-bearing equipment that is currently utilized by the U.S. military. PALS (Pouch Attachment Ladder System) is the webbing system that provides the modularity in MOLLE gear. PALS consists of rows of 1" webbing positioned in parallel 1" apart, with stitching spaced 1.5" along the webbing.
When designing the Dashpack, we experimented with many webbing setups. The team found that having even just 2 rows of PALS webbing changed the aesthetics of the backpack, and leaving just 1 row of 1" webbing sacrificed a lot of function and made the pack look incomplete and quite frankly - dinky.
Having one wider webbing sewn across the Dashpack gave it the look we wanted, as it grounded the base of the backpack aesthetically, while also providing the functionality to attach extra gear. In fact, it also simplifies the threading process associated with attaching MOLLE gear.
Our Dashpack uses 1.75" Mil-Spec webbing, which is both highly abrasion resistant and strong. The webbing is bartacked to the Dashpack at a higher resolution than military spec, and is built with one of the toughest construction setups out there.
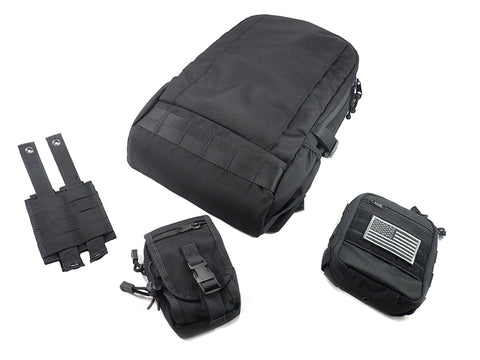
The front ladder stitching on ARKTYPE gear is compatible with most MOLLE gear systems. To attach any pouch, all that is required is 2 rows of standard MOLLE webbing and attachment straps on the to-be attached gear.

To Attach:
Step 1: Thread the attachment straps under the first row of PALS webbing on the pouch. Most pouches come with sewn in attachment straps.

Step 2: Slide the attachment straps through the Dashpack's webbing slots and position to the desired location. The added spacing between the stitching allows some additional flexibility.

Step 3: Double back the attachment straps and slide the straps under the next row of PALS webbing on the pouch. The fit will be slightly tighter as the webbing is wider, however, this provides additional friction for security.

Step 4: Once the strap has passed through the second row of PALS webbing, secure the straps by snapping the ends to the snap sockets on the pouch. Once snapped in, adjust the pouch as needed to complete the attachment.

The pouch will be securely attached in this fashion, and in our extended testing, will not disassemble under normal operating conditions.

Continuous PALS Webbing (1" Webbing without Breaks)
Some MOLLE pouches come with continuous webbing, where 1" webbing is sewn adjacent to each other without the standard 1" gap. This type of configuration adds more flexibility in the vertical positioning when attaching gear.

You can do attach the pouch in the same configuration as the standard MOLLE pouches above. However, you can also take advantage of the additional webbing for an alternative attachment. 4-5 rows of continuous 1" webbing is one of the most ideal setups to attach to the ARKTYPE Dashpack, as the wider Dashpack webbing fits on 2 continuous rows of PALS webbing perfectly.
To Attach:
Step 1: Thread the attachment straps under the first row of PALS webbing on the pouch. Most pouches come with sewn in attachment straps. In this example the pouch does not have its attachment straps sewn in, so the second row of PALS is threaded through instead. The key is to thread under the row of PALS webbing that will sit directly above the ARKTYPE Dashpack webbing.

Step 2: Slide the attachment straps through the Dashpack's webbing slots and position to the desired location. The added spacing between the stitching allows some additional flexibility.

Step 3: Double back the attachment straps over the next 2 rows of webbing, and slide the straps under the 3rd row of PALS webbing on the pouch. The 2 skipped rows of webbing matches the width of the ARKTYPE webbing for a nice fit.

Step 4: Once the strap has passed through the row of PALS webbing on the pouch, secure the straps by snapping the ends to the snap sockets on the pouch. Once snapped in, adjust the pouch as needed to complete the attachment.

The pouch will be securely attached in this fashion, and like the previous configuration, this setup will not disassemble under normal operating conditions.

ALICE Systems
The ALICE (All-purpose Lightweight Individual Carrying Equipment) system is an older generation of modular load-bearing equipment that was the predecessor to MOLLE and used previously by the U.S. military. The ARKTYPE Dashpack is designed to also be compatible with gear utilizing ALICE attachments.
Installing Alice gear to Dashpack is simple - simply clip on the ALICE Clips between the pouch and the Dashpack front ladder webbing. It's recommended to use at least 2-3 ALICE clips for security.
Also in Mission Log
Adjusting the Shoulder Harness on the Dashpack
The Dashpack is built with a unique, no-dangle shoulder harness design. The shoulder straps are free of loose hanging straps to maintain a clean, sleek look while being worn.
For some users, this is a new method to adjust the shoulder straps. This is a simple instructional guide on how to adjust the Dashpack's shoulder harness.
Click on the Read More link below for the full instructions.
Paracord Pull Cable Install Guide
This is a quick reference guide for tying the paracord pulls for the zipper pull cables, PMK pulls, and camera wrist strap pulls. All three use the same modified hitch knot method to install.
Click on the Read More link below to see the full detailed instructions.

Silencer Operating Guide
Assembling the ARKTYPE Silencer is quite simple. Here's a short guide and reference manual to get things set up.